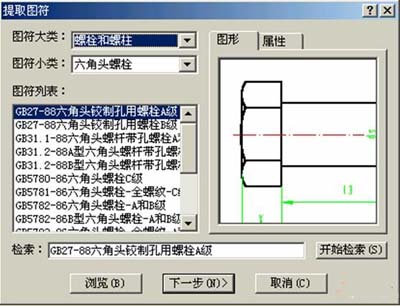
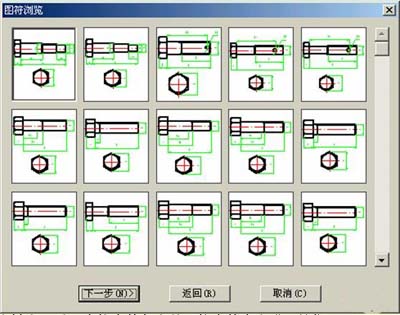
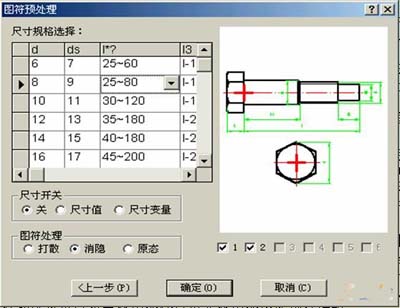
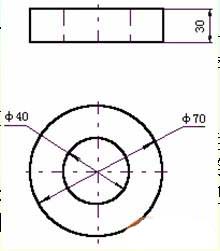
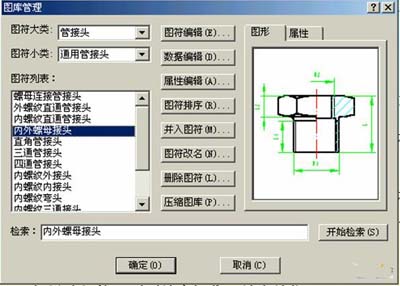
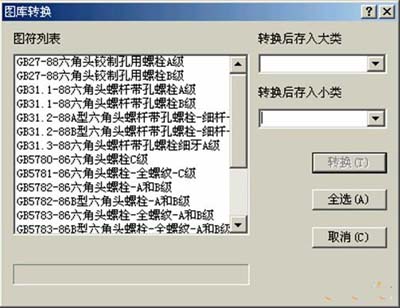
2 Gallery Electronic boards define the various standard parts and common graphical symbols that are often used in design, such as bolts, nuts, bearings, washers, electrical symbols, and so on. These graphic inserts can be directly extracted when designing drawings, avoiding unnecessary duplication of work and improving drawing efficiency. You can also define other standard parts or graphic symbols that you want to use. The standard parts and graphic symbols in the electronic drawing library are collectively referred to as icons. Icons are divided into parameter icons and fixed icons. The electronic board provides editing and management functions for the library. In addition, for the parameter icons already inserted in the figure, you can also modify the size specifications by the "Drive Icons" function. The operations that can be performed on the library are: extract icon, define icon, drive icon, library management, and gallery conversion. 2.1 Extract icon The command drop-down menu "Draw → Library Operation → Extract Icon". Drawing toolbar picking library operations After that, pick up the extract icon The function selects the appropriate icon from the gallery and inserts it into the appropriate position in the diagram. operating The steps to extract the icon are as follows: 1) After clicking the "Extract Icon" button command, the system will pop up the Extract Icon dialog box, as shown in the figure below, select the icon to be extracted in the dialog box. (1) The left part of the dialog box is the icon selection part. The system divides the icon into several large classes, each of which contains several small classes, and can also create its own class. In the icon list box, all the icon names in the current subclass are listed. Click the drop-down button of the "icon big class" combo box, and select the desired large class from the pop-up icon type list box. At this time, the content of the "icon small class" combo box is automatically updated to correspond to the large class. The small class is made into a list. (2) The right half of the dialog box is an icon preview, which allows you to preview the selected current icon. Right click on any point in the pre-display box, the graph will be magnified and displayed around the point, and can be enlarged repeatedly; while pressing the left and right buttons of the mouse in the pre-frame, the image will be restored to the original display size, as follows The figure shows. 2) The lower part of the dialog box is the icon search edit box. If you don't know which class the icon you want to extract or you need to view all the icons in the library that meet certain conditions, you can use the icon search function. 3) After selecting the icon, click the “Browse†button to enter the “Icon Browsing†dialog box, as shown below. 4) After the icon to be extracted is selected, if the fixed icon is selected, the interaction process of inserting the icon is directly entered, and the icon is inserted into the appropriate position in the figure; if the parameter map is selected Symbol, click the "Next" button to enter the icon pre-processing dialog box, as shown below, select the size specification and size switch and icon processing options, and then insert the icon into the diagram. One extraction can insert the same icon multiple times. (1) The right half of the icon pre-processing box is the icon preview area. There are six graph control switches in the lower row. You can open or close a view with the left mouse button, and the closed view will not be extracted. (2) The left half of the icon pre-processing box is the icon processing area. The first item is the size specification. It appears in the form of a spreadsheet. You can see more data information through the scroll bar. Use the mouse and keyboard. You can edit the contents of any cell in the table. 2.2 driver icon The command drop-down menu "Draw → Library Operation → Drive Icon". Drawing toolbar picking library operations The function modifies the size specification of a view of a parameter icon that has been inserted into the diagram. After the operation of the pick command, the status bar prompts: "Please select the icon you want to change:", select the icon to be driven according to the prompt, the system pops up the "icon pre-processing dialog", modify the size and options in the dialog box. The operation method is the same as when the icon is extracted, and then click the "OK" button, the driven icon is replaced in the original position, and the icon generated by the new size is replaced. 2.3 Define the icon The definition icon is defined by the parameterized graphics or fixed graphics that are not used in the library and stored in the library for later recall. The types of graphic elements that can be defined into the gallery are: lines, circles, arcs, points, dimensions, blocks, text, hatching, fills. If there are other types of graphic elements such as polylines, splines, etc. that need to be defined in the gallery, you can make them into blocks. The command drop-down menu "Draw → Library Operation → Define Icon". The function's own definition icon is stored in the library for later recall. The steps to operate the definition icon are as follows: (1) First draw the graphics to be defined, dimensioning, as shown below. (2) Select the "Define Icon" command, the status bar prompts "Please enter the number of views of the icon (1)", enter the number of views in the input box "2", press the Enter key to confirm. Or press the Enter key directly to accept the default value of 1. (3) When the status bar prompts "Please select the first view", use the mouse to pick up the first view of the icon, and then click the right mouse button to confirm. (4) When the status bar prompts “Please specify the view base pointâ€, use the mouse to specify the base point. For precise determination, often use smart point and navigation point to locate. You can also use the space bar to pop up the tool point menu to make precise determination. (5) If the view contains dimensions, the status bar prompts "Please specify a variable name for each dimension of the view." Use the mouse to click on any size in the current view and enter the size parameter in the pop-up input box. The size parameter should be consistent with the size parameter used in the standard or the generally accepted habit. After specifying the size parameter, click the right mouse button to end the operation of the current view. Follow the prompts to do the same for the rest of the views. (6) After all the views have been specified, the “Element Definition†dialog box will pop up, as shown in the figure below. (7) Click the "Next" button to pop up the "Variable Property Definition" dialog box. (8) Click the "Next" button to pop up the "Identifier Storage" dialog box. 2.4 Gallery Management The library of CAXA electronic drawing board is a library open to users. It can not only extract icons, define icons, but also manage the library through the library management tool provided by the software. The command drop-down menu "Draw → Library Operation → Library Management". Pick up library operations in the drawing toolbar The function edits and modifies the files and icons in the gallery. After the operation of the pick-up library management command, the "Library Management Dialog" pops up. This dialog is very similar to the previous Icon Extraction dialog. The icon selection on the left, the preview on the right, and the lower icon search are used in the same way. Only eight operation buttons are arranged in the middle, and all the functions of the gallery management can be realized through these eight buttons. The specific functions of the gallery management are: icon editing, data editing, attribute editing, category sorting, icon renaming, gallery conversion, deleting icons, compressing the library, etc., click the corresponding button to operate. 1) Icon editing Icon editing is actually a redefinition of the icon. You can make a comprehensive modification to the original icon in the gallery. You can also use the existing icons in the gallery to modify, partially delete, add or recombine, and define them to be similar. New icons to reduce duplication of effort. (1) In the "Library Management" dialog box shown in the figure below, select the icon name to be edited, as in the case of extracting the icon. (2) Click the "icon edit" button, the icon edit dialog will pop up. If you only want to modify the definition of the graphic element in the icon or the attribute of the dimension variable, you can select the first item "Enter Element Definition", then the "Library Management" dialog box is closed, enter the element definition, and start editing the definition of the icon. modify. (3) If you need to edit the graphic, base point, size or size name of the icon, you can select the second item "Enter Edit Graphic", and the same "Library Management" dialog box is closed. Since the electronic board is to insert the icon into the drawing area for editing, if the currently open file has not been saved, the file will be prompted to save. (4) Click the “Define Icon†button after the modification is completed, and the subsequent operation is exactly the same as the definition icon. (5) If the third item is selected, the operation ends and the editing is abandoned. 2) Data editing Data editing is to edit and modify the standard data of the parameter icon. (1) After selecting the icon to be edited in the "Library Management" dialog box, click the "Data Edit" button, the "Standard Data Entry and Edit" dialog box will pop up, which is displayed in the table in the dialog box. The existing size data of the icon is edited and edited. For the editing method, see standard data entry and editing. (2) Click “OK†button after editing to save the edited data, and return to the “Gallery Management†dialog box for other operations. Click the "Cancel" button to discard your changes and exit. 3) Property editing Property editing is to edit and modify the properties of the icon. (1) After selecting the icon to be edited in the "Library Management" dialog box, click the "Property Edit" button, the "Attribute Entry and Edit" dialog box will pop up, and the icon will be displayed in the table in the dialog box. The defined attribute information is edited and edited. The editing method is the same as the attribute entry and editing when defining the icon. (2) Click “OK†button after editing to save the edited properties and return to the “Gallery Management†dialog box for other operations. Click the "Cancel" button to discard your changes and exit. 4) Icon sorting Icon and category sorting is used to arrange the icon class, the icon class, and the position of the icon in the class, according to the user's wishes, so that the most commonly used categories and icons are arranged in front, which is convenient. The extraction of the icon. 2.5 Gallery Conversion The command drop-down menu "Draw → Library Operation → Library Conversion". Drawing toolbar picking library operations The function library conversion is used to convert the gallery in the lower version of the electronic drawing board to the library format of the current version of the electronic drawing board. After the operation of picking up the "gallery conversion" command, the system pops up the "Open old version of the main index or small class index file" dialog box as shown below, select the index file of the library to be converted in the dialog box, and click the "Open" button. , the dialog is closed. (1) If the main index file is selected, all the major classes and subclasses it contains are converted. The screen shows the conversion process. (2) If the small class index is selected, the "Gallery Conversion" dialog box shown in the following figure will pop up. All the icons in the gallery to be converted are listed in the list box of the Gallery Conversion dialog. Chain Lock,Chain Locks,Square Blade Padlock Pujiang Yalian Locks Co., Ltd. , http://www.pjpadlock.com